
Lightroom: Exporting & Importing Images after a Workshop
 As a lot of my residential workshops include post-processing of images I often get asked: "how do I Import my edited images into Lightroom when I get home?". So this is a quick tutorial for those of you who attend not only my workshops but others where you have processed your images using Lightroom and you wish to see those image edits on your main computer later. There are many different ways to do this but this is the one I recommend. I have also supplied some screenshot images below to help with understanding this workflow, which will expand when you click on them.
To start with I am going to assume you have been working on Raw images in Lightroom on your laptop computer (or mine) as the Raw setting on your camera is what I encourage participants to use (as it offers more flexibility when processing). I shall also assume that your images are back in the Library Module ready for exporting after having processed them in the Develop Module whilst on the workshop.
Exporting images from your laptop
- Locate the required images and select one or more of them by clicking on each of them - holding down the Ctrl [PC]/Cmd [Apple] key on your keyboard (The selected images should now have a light grey border). [Screenshot 1]
- Click the 'Export' button found at the bottom of the left panel.
- A pop-up Export box will now appear.
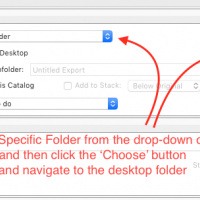
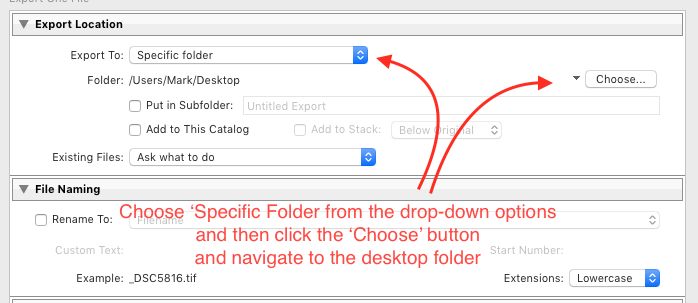
- Export Location: Starting from the top down (right-hand side) choose 'Specific Folder' from the Export To: drop-down box.
- Just below this box click the 'Choose' button and navigate to the folder you wish to temporarily store your images - I usually suggest the Desktop [Screenshot 2]
- File Naming: I don't tend to rename my images as I prefer the image number to be the unique identifier for when I rename my images later, so just make sure that the 'Rename To:' box is unticked.
- Video: Ignore this
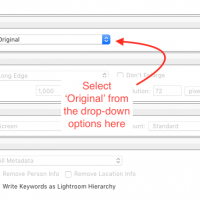
- File Settings: This is the important bit! In the 'Image Format:' section, choose 'Original' from the options given. [Screenshot 3]
- Image Sizing, Output Sharpening, Metadata and Watermarking should all be greyed out as you have chosen to export the original image, so ignore these sections.
- Post-Processing: In the After Export: drop down options choose 'Do Nothing'.
- Now click the blue 'Export' button.
This will now export your images to the desktop (or wherever you selected). However, when you take a look you will also notice that they are accompanied by some .xmp files, too. These files display the same name as your original file except the suffix ends .xmp as opposed to the suffix your camera's image files come with. We are now going to transfer these images and .xmp files to a USB memory stick (although you could use a memory card or external hard drive if you wish). However, it's important that you also transfer the .xmp files, too as these possess all the edits carried out on the workshop.
To do this insert a memory stick into your laptop and drag and drop the images - and the .xmp files from your desktop to the USB memory stick (I recommend creating a folder called 'edits' onto your memory stick first and then drag the files there).
Importing edited images into Lightroom on your main computer
I shall assume you are now at home with your main computer and that you have inserted your memory stick and have Lightroom open and you are in the Library Module.
Important: Make sure to import your edited images first before importing your camera's memory stick from the workshop as a whole, otherwise Lightroom will think the images are already imported (which they will be but not edited!)
- Select the 'Import' button at the bottom of the left panel. The Import dialogue box will pop-up.
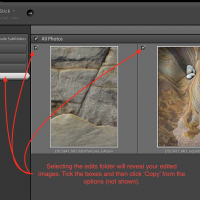
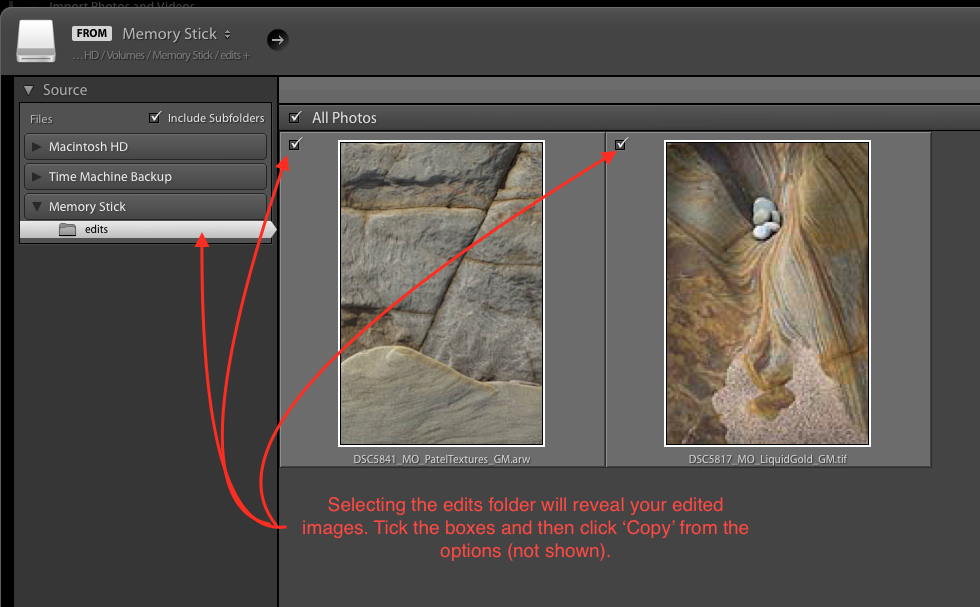
- From the 'Source' section in the left column navigate to the 'edits' folder of the USB memory stick that should be inserted in your computer. The images you copied to this folder should now be displayed in the middle panel section. [Screenshot 4 ]
- Select all the images you wish to import and make sure that each image box is ticked.
- In the top middle row select 'Copy'
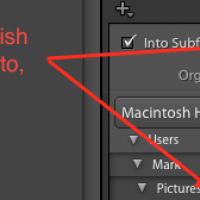
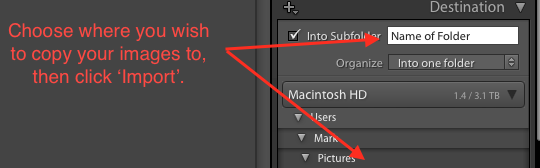
- In the 'Destination' panel in the right column choose where you want your images to be imported as you would when you import images directly from your camera. [Screenshot 5]
- Now click the 'Import' button.
SCREENSHOTS

And that's it. Lightroom will have automatically noticed the .xmp files in the same folder and also imported them, too! You should now notice that your imported images will have all the edits in place from the workshop. The only caveat is that the History section isn't recorded, sadly. However, you can go still scrutinise the sliders and select any of the tools such as the radial and graduated filters to see where they have been applied etc...
I hope this helps and look forward to you joining me on another workshop soon. :-)